The ZEBRA:
The Flatbed
This part also took a lot of thought (are you getting the idea that this was all I ever thought about?) Things I wanted my Flatbed to do were to be versatile, stout, and blend in well with the rest of the truck. It should accommodate a slide-in pick-up camper, a lot of gear and toys, have an under bed fuel tank, protect the lighting and exhaust, be cab-width, provide for future unforeseen modifications, use a three point pivot mounting system, have removable fender extensions/mud flaps, incorporate receiver hitches, spare tire carrier, and look good.
I had originally intended on going all aluminum. But then decided against it since I didn't have the aluminum welding experience or ability to self engineer aluminum structures. I'm pretty comfortable working with steel and going by the TSD (That Should Do) overbuilding engineering style.
I started out with 1/4 x 3 inch angle steel for the exterior framework. This, when mounted in line with the body armor, would blend in well. Additionally, I formed the front corners with the same radius as the body armor rear corner has to keep consistency of design. Length was kept to a minimum so as to not interfere with departure angle (dimensions are roughly 6x6 ft.). Wheel cutouts were made out of 1/4 inch flat bar to allow full suspension articulation without interference. The rear panel was recessed in 1/4 x 2 inch angle - this would provide protection for the lights and exhaust (which was also to exit from this panel). 4 inner rails were added front to rear for strength, and drilled and tapped many times for versatility. Mounting tabs were located anywhere I thought there may be a need at a future time with special consideration for things I had planned like fenders and s storage boxes. Two 2 inch receivers were placed in the rear at 24 inches O.C. just like the rear winch mount, so accessories could be interchanged. One accessory in the works is a bed extension, which would slip right into the receivers to provide 18" more length for extra storage on longer trips.
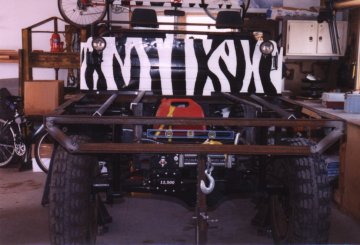
Making the frame.
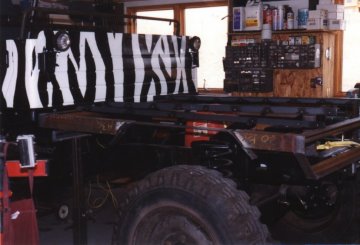
Notice how the rear lights will be recessed inside the angle iron rear.
The whole thing was then diamond plated with 1/8-inch stock and drilled and tapped from the top no less than 36 different places on a grid so that any bed top accessories could easily be relocated in many different areas.
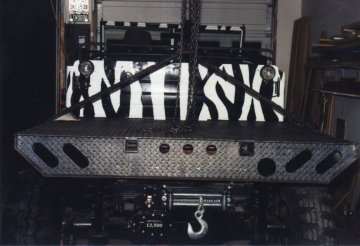
Diamond plate installed, cutouts for lights and exhaust, and two 2 inch receivers (again).
The bed is mounted with two solid points in the rear, and one pivot in the front. The pivot bolt is 1-inch grade 8 sleeved with 1/4 inch thick DOM seamless tubing and is in the same plane as the body pivot. Pivot itself is fabbed from 1/2-inch plate and 1/4 x 2 inch s square tube. Frame mounts were made from 3/8 inch flat bar and formed similar to the stock front cargo bed mount. Mine being a double cab, that mount is used for a body pivot mount, so I needed to make others.
My stock fuel tanks were removed in preference for an under the bed, out of harms way, unit. See the Zebra Fuel tank Page for details. I wanted maximum capacity for extended excursions and the ability to scavenge fuel at extreme angles. What I ended up with was a 55 gallon baffled tank including a 5-gallon sump. I had a local sheet metal shop fab the pieces to my specifications and I brazed it all together. Baffled compartments are no larger than 5 gallons and I also added a piece of 2-1/2 inch exhaust tubing around the fuel pickup as an added baffle to prevent fuel starvation.
I added a drain plug, fuel pickup, fuel return, 90 ohm sending unit and one extra fitting just in case. The sending unit was adjusted so that an empty tank on the gauge would leave a 5-gallon reserve. A locking gas cap was added and recessed into the fuel filler, which is on the driverís side flatbed floor.
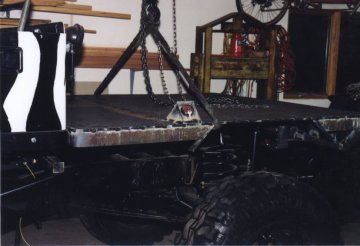
Fuel tank filler.
Fender extensions have been made to fit the wheel openings. These were designed to be a fender flare with rubber extension, inner skirt, and mud flap mount. 6 bolts hold them in place, which can easily be removed for tight trails.
I have also made some temporary stake sides. These may get 86'd in favor of a canvas supporting/over bed cargo rack system. Having pre-tapped holes in the bed has given me versatility I don't think I've yet even begun to realize. The under bed mounting tabs and tapped holes will allow modified ammo boxes to slide in and out with ease. Again, this will help provide clearance for extreme trails.
All the thought put into this really has paid off.
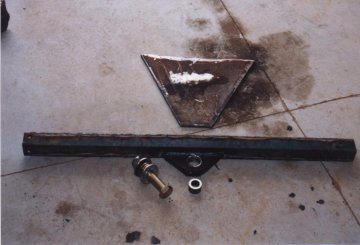
Pieces for fabrication of front pivot mount.
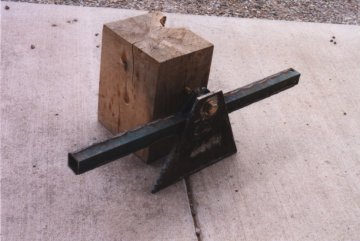
Front pivot fabricated (viewed upside down).
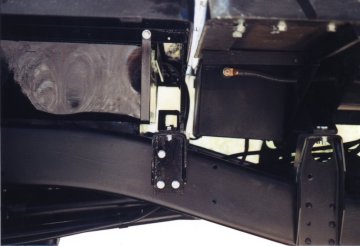
Front pivot in place - note also the fabricated frame mounts for the pivot.
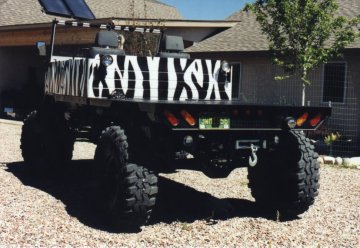
Now I am street legal!! Notice the exhaust on the right side, out of harms way, Swampers, Zebra striping with families initials, and underbed backup lamps.
The Flatbed - Update 2006
All the thought that went into designing this flatbed has really paid off. Things
that have been the most useful are the two 2 receivers, and the pre-tapped holes
on grid. My original intention, if you recall, was to have a slide-in pickup camper
to use on excursions. That was scrapped, however in favor of my new set-up.
On my first overnight outing with my son, we went to a local area not ten miles
from home using a ground tent. Well, its hard to find a flat spot in the Rocky
Mountains and thunder storms are not infrequent. So we got rained upon and soaked.
Next day we went home, dried out, and moved to another location for the next night,
about 30 miles away now, on Pearl pass. Even rockier, and more rain! Enough already.
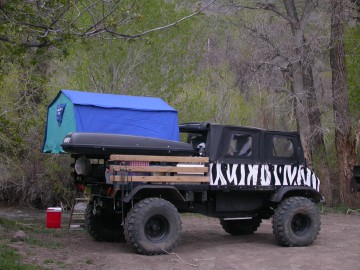
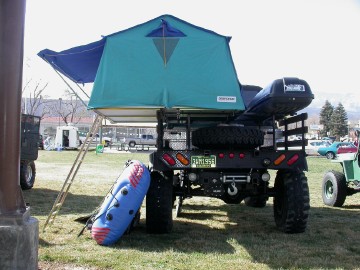
The very next day I ordered an Overcamp rooftop tent. This thing is slick. Weighs
115 lbs, sets up in less than 5 minutes, and is usually mounted on car or SUV roof
top racks. So, basically a loft shelter, flat, dry, and comfortable yet very basic.
The only thing was to figure out how to mount it on my flatbed without preventing
access to the other items I had already installed and didn't want to part with.
These other items include, and were mounted using the pre-tapped holes, a pickup
truck tool box, stock sized spare tire, and side rails.
The only way I could think of to mount the tent was to fabricate a sliding rack/rail
system that would allow enough support for the tent with people in it, allow tool
box access by sliding the whole shebang back, and be lifted off the bed high enough
to clear the spare tire and side rails. It also had to be strong enough so that it
could support other gear such as bikes, removed doors, Yakima rocket storage box,
as well as not rattle around while on rough terrain. It worked! I've since used
this over a dozen times, in thunder storms, snow storms, hot Moab nights, and in
rocky locations, all in complete comfort with surprising warmth or coolness. And
dry! In order to be affected by wind, the whole truck has to move. Uneven terrain
is corrected by shoving a couple of rocks in front of some tires and driving up
onto them.
The rack also created some storage room to either side of the spare, under the
tent and rocket box, so bungee cord attachment sites were added and this is where
I carry coolers and storage boxes full of food and essential, quick access gear like
cookware and propane stove. This also created the need for a surface on which to cook
or prepare food (out of reach of my dog!) and so the 2 receivers became mounting points
for a fold down tailgate that can be locked in horizontal or completely down positions.
It really turned out to be a nice package. Clothes stay dry and dust free in the rocket
box, the dog is crated and bungeed in the back seat (shes out while on the trail),
Kimbrell rides shotgun in the passenger seat, and there is still room left in the
cab for other stuff!
All this, without huge conversion time: 4 M10 bolts remove the tent with rack and
storage box attached, total weight about 150 lbs.
Unimog - 11.jpg
Unimog-06.jpg
Next: Fuel tank
-
|
