The ZEBRA:
The Brake System
Let's face it, brakes are important. Whether driving on the road or trail, if you can't stop, your toast. So nothing overlooked here (hopefully).
All components were renewed with the exception of the master cylinder, which was rebuilt with fresh parts, and brake drums, which were machined. We're talking new lines, fittings, hoses, wheel cylinders, clips.....everything!
Then imagination took the best of me and I added a brake booster, park lock, and steering brakes (i.e.. cutting brakes) to the system. This was not a simple ordeal, but here is why I added those items.
The vacuum assisted brake booster is self-explanatory. The park lock is to offer a greater amount of safety while stopped on the trail. This unit will hydraulically lock all four wheels with the push of a button. The steering brake is to be questioned. My theory is that I could reduce the turning radius by locking one back wheel and powering the other three. No one "in the know" could tell me for sure if this would work or not. We'll see.
To plumb all these components took some figuring. Locating them took even more. Sitting in the cab, I tried several potential floor locations but each time found obstructions, or inconvenience. Finally, in a desperate, last-ditch, seemingly futile attempt, I slammed the steering brake levers on the dash over the engine cover, and that is where they remained. In this location it is easy to reach both by driver and passenger alike, does not prevent removal of any access panels to the transmission or engine, and looks way cool. The park lock was similarly located just to the left of it, and under the hand throttle.
Plumbing was a nightmare! I used no less than 15 meters of MB issue 6mm brake line and 11 flex hoses. Fortunately, Unimogs have three different flex hoses: a long male/female used for the front wheels, a short male/female used for the front torque tube, and a short female/female used for the rear torque tube. Using these in varying locations allowed me to plumb everything using factory Unimog parts!

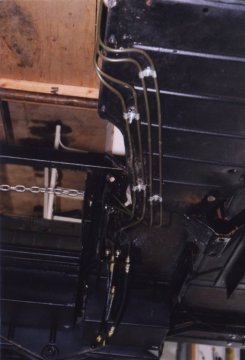
Brake lines running under the body to the dash mounted parklock and steering brake handles.
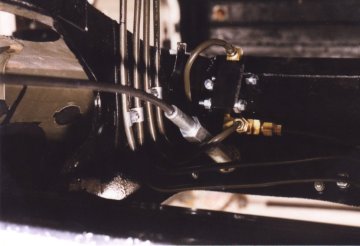
In order to do all this, brackets had to be made or modified anywhere there was a transition from a flex to steel line. Note that there are now two rear lines, one to each rear wheel. The under floor area at the drivers side is very busy with brake lines but turned out very neat. Extensive use of flex lines was to accommodate component and body movement. Also, some steel lines had MB Unimog fittings on one end and SAE fittings on the other to adapt the SAE park lock and steering brake.

Brake lines snaking around the hand throttle cable.
One point of note: one of the rear brake drums did not have threaded holes for pressing it off. It took me two hours of tedious "precision" work with a crowbar and hammer to get that sucker off! It was later drilled and tapped so this would not happen again.
Additionally, all brake lines which seemed vulnerable to abrasion or contact with trail debris - those that run along the top or side of an axle housing - were wrapped with stainless steel springs to help add protection. Front wheel flex hoses were to be changed to stainless braided units, but I could not source out anyone who could make some with M12x1 double inverted fittings - an MB special item. If anyone can help me here I would appreciate it. In the meantime, I run trails with a couple of spares in the toolbox. The offset of the Stockton wheels exposes these lines making them very vulnerable. One idea I had was building a shield for them, which may happen this winter.

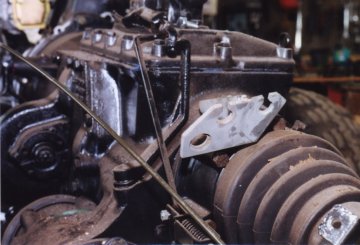
Stock rear flex hose mount.

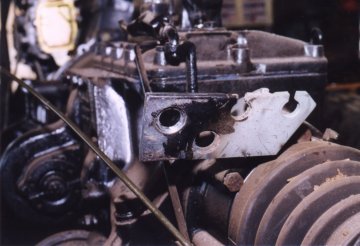
Modified rear flex hose mount.
Another thing I did was to modify the parking brake handle. I grafted a thumb-locking handle from a '99 Jeep XJ to the shaft of the Unimogs handle to significantly improve not only the esthetics, but also the skinned knuckle potential that it had. See the Brake Handle Update Page for details.
How's it all working? A little too early to tell I think. Brakes stop well. Parkloc is extremely useful. Hand brake is very comfortable but the cables need a little more a adjusting. The cutting brakes have the power to stop wheel travel with the clutch engaged, but powering the wheels, even with open diff, will override the brake. So these need more de-bugging. I'm thinking either I need better leverage on the handles or the cylinder in the steering brake is not sized proportionally to the wheel cylinder it activates. I'm also a little suspect of the vacuum system, either the vacuum pump or the vacuum brake booster. The brakes are stopping well, but not great. Needs more diagnostics which I haven't given time to as of yet. I also feel there may still be some air in the hydraulic lines. That will be the first step in treatment. I've bled every component several times in the correct order, but may have to repeat it a few more times. There are a lot of lines and junctions that can trap air in this system!
Brakes - Update 2006
The brakes are something else that has not quite lived up to my expectations. The
cutting brakes are not strong enough to lock up a wheel I think because their
cylinders are too small for the wheel cylinders they are activating therefore not
putting enough pressure on them. I plan to change this set up to having one line
lock per rear wheel. this way I'll be able to use the brake pedal to create pressure,
then lock one wheel with a button, and release the other three. This will also free
up my hands and feet for other tasks. We'll see.
One other problem encountered, and actually foreseen, now that I read back, is that
the offset of the 16.5 inch wheels exposes the banjo fittings into the wheel cylinders.
This past summer while on a trail outing we pulled into our campsite for the night and
my pedal went to the floor! Not good since we were far from civilization and it was all
downhill and rocks on the return. I jumped out and looked for signs of brake line damage
and found the right rear banjo fitting leaking. A quick grab for a 17mm wrench stopped
the leak before I had even lost enough fluid to require rebleeding the system.
Fortunately, I carry Brake fluid with me so I was able to top up the reservoir.
Apparently, I had snugged up to a rock and it loosened the bolt as I continued to
move forward. Had this happened to the drivers side it would have only tightened
the bolt. I now make it a point to check these frequently, and plan on building a
rock guard for them.
The spring wrap I added to the vulnerable areas of the brake lines have been a good
thing, or so I think, since I have found tree bark and debris caught within its
coils. Now I make it a point not to run over trees and shrubbery but there are
occasional fallen logs and such on the trails and I guess they get kicked up by
the tires and have contacted the lines.
Next: Body
-
|
