The ZEBRA:
Power Steering
Actually, technically what I have is not called power steering, but called hydraulic assisted steering. It is a three-part system. There is a pump, a control valve, and a hydraulic cylinder. The power steering pump is from a Mercedes turbo diesel but relocated from its original location on the engine to fit in the Unimog engine bay. The control valve is a unit, which is spliced into the drag link and has four hydraulic ports to it: high pressure in, low pressure return, and two high pressure ports to the ram. It works by sensing forces applied to the drag link from the pitman arm and sends hydraulic pressure to the ram through one of two ports to either extend or contract the ram. The ram was a 1-1/2" bore 8" stroke unit mounted on custom brackets. The fixed end is at the differential housing, and the moveable end is on another bracket at the tie rod end opposite the steering damper bracket.
Big mistake here was having someone else perform this conversion. My unfamiliarity with hydraulics gave me a sense of uneasiness, so I felt that it would be better to hire it out. NOT. There were numerous errors in the installation of the system. The power steering pump was mounted in the same plane as the engine. But the engine is mounted 15' off plumb. With forethought, it should have been mounted 15' off so that the pump would be functioning at level once the engine was mounted in its new position (same guy did both jobs). The power steering lines needed to be prefabricated to route them away from the cooling fan. The hydraulic cylinder bracket at the differential housing utilized existing hardware - which was well intended, but the extra thickness of the bracket allowed very little thread contact of crucial bolts (about 5mm) which caused some differential fluid leakage and has the potential to strip threads if over tightened, or become loose in normal duty. Additionally, one of the mounting bolts required a spacer (about 15mm thick) to place it at the correct distance for supporting the bracket. This bolt already pulled duty holding the steering damper bracket. So not only was this bolt hardly threaded in, the amount of shear leverage on this bolts head from the hydraulics screamed failure potential. The tie rod end bracket for the steering cylinder was mis-located so that it prevented me from having full lock turning to the right side. This bracket, which shares the fasteners of the steering damper, also has a tendency to cause the tie rod end clamp to slip and be pushed toward the tie rod end. And finally, the PS return line used some pretty bogus salvaged fittings.
And then there's the defective seal on the hydraulic cylinder, which needed replacing, but this cylinder needed to be cut open to service. It was returned, but clocked 90' when rewelded. So it was sent back again, and then only functioned briefly when re-installed. A replacement cylinder could not be ordered since it was a one-off unit with no manufacturers castings. All this done with someone that does not return phone calls! Finally I gave up and took on the chore myself.
What I know now about this system I could write a book. First off, the control valve is an obsolete part. (Thanks a lot!) They were made by Garrison and were used in Ford F150 and 250s between the years 74-76 and International pickups years 68-70 (like the one I have) as their hydraulic assist. They got a bad rap due to tendencies to develop leaks. They're rated for 1100 psi and up to 11 GPM depending on the spool it came with. And they are as hard to come by as crewcab 404's ;-), so don't bother going my route. Garrison still has some repair kits and "spools" in their obsolete parts bin, but no complete units. I have been fortunate enough to acquire a spare unit, spool and rebuild kit. Also, in my research, I have been able to come up with an alternative, which is still in production. I'm going to try and piece together a conversion parts list for folks interested in having a go at it.
For a hydraulic cylinder, I went with an AGR RockRam. This is a 1-3/4" bore, 8" stroke, heim jointed serviceable cylinder good to 2000psi. The heims allowed me to better locate the cylinder tucking it up out of harms way without tie rod interference (like the other unit did). The base mounting bracket was reworked to eliminate the spacer, and corrected length hardened hardware was used to mount it. The tie rod bracket was remade and properly positioned to allow full lock to lock steering, and the tie rod clamp was tagged a couple of times with the welder to prevent it from slipping.
Remounting the pump is on my TO-DO list. At one point I considered a stronger pump, as mine is set at 950psi and 3gpm. But my control valve will not allow it. I've been monitoring fluid temperature (finger dipstick method) to see if I'll need an in-line cooler, but so far, so good.
How does this work in the field? I can tell you this, with the truck parked in my garage, engine running, I can turn the steering wheel - oversized TSL radial swampers on offset wheels - with one hand lock to lock. Trail experience however is limited since system had been riddled with bugs and plagued by tall excuses and short performance from the installer of the initial system.
I've come up with an alternative to the control valve model that I currently have to one that's still in production. A few things I need to work out to have it fit in the Unimog 404 system though. I also need to make sure the cylinder is sized correctly and there are several alternatives available, all heim compatible.
Currently, with the system I am running now, I can easily palm the steering wheel with one hand lock-to-lock while burdened with a front mounted plow as long as I have the least bit of forward or backward motion. If stopped, I need to grip the wheel rather than just palm it. Much improved over the stock powerless system. I can't wait to try this on the trails.
Steering - Update 2006
Power steering seems to be creating a lot of interest, so I guess its time I provide
an update for y'all...
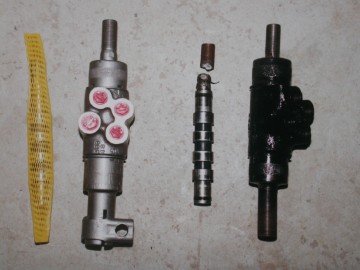
I have trashed the initial - obsolete- 1/2 ton truck control valve that was installed
and have opted for a unit in current production for 100 ton cranes with 4 wheel front
steer. Can you say beef? This is a Garrison unit that you custom order based on your
requirements - but, should you not have dialed it in right the first time, it is rebuildable
to any other specs. Lucky for you I spent many hours asking, and reading up on what my Mog
would need based on how I wanted it to handle. I hope you can benefit from what I've learned.

Old.steering.valve.jpg
There are many factors to consider when specifying your steering valve which go beyond
what I care to write about. But, three of these factors I will talk about are: Reaction
area, which determines the amount of "feel" you get from the wheels. Since I was building
a rig capable for long road trips I opted for better road feel/response in lieu of brute
strength.
GPM rating- which is the maximum flow the control can handle. I chose the lowest they had
as it was sufficient for my pump.
And Port location. Critical to clearance your hoses - I chose the "BL" location.
The Model number I ordered was GB2193-BL - you may want a different setup, so do your
research. Call Garrison and they will send you all the specs on the stuff the valves
and other stuff they make. Now, at least you have a jumping off point, which should
help a lot. This unit has a 1-1/2 inch ball stud, 5 GPM rating, and a 0.7 sq. in.
reaction area. A larger reaction area, say 1.0 inch, would give you more strength,
less feel.
The control valve has a ball stud on one end (more on this later) which inserts directly
into the pitman arm, and the other end is female threaded 1-1/2"-12NF. From there you
must fabricate the rest of the drag link, overall length, for me, measured to require
41" (sorry not to provide metric measurements, as I'm sure many of you use, but here
is the States, the old archaic form of inches and feet is the norm, and therefore
easier to do business with.) Here is how I made the rest of my drag link.
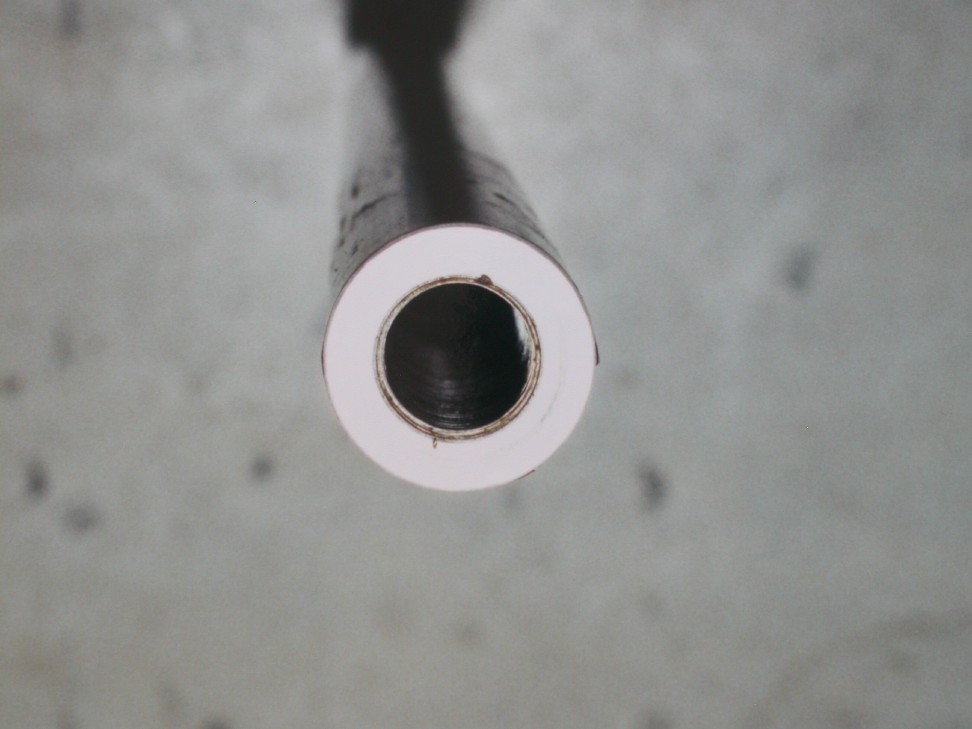
Starting with a piece of 1 1/2 inch, 3/8 wall DOM tubing, I had a machinist thread
both ends of the tube (after it was cut to length) 7/8"-14NF. I also had him machine
two adapters for between the steering valve and the tube. The adapters have male
thread on both ends, 1-1/2"-12NF, and 7/8"-14NF. I had him make me two adapters,
since I planned for this part to be the weakness of the system. To do this, I had
him machine a 5/8 Dia area between the two threaded ends. The 1/2 ton steering valve
I had initially had a weak spot 1/2 Dia and required specialized tools to rebuild.
Now I can field fix in 15 minutes should it ever happen again.

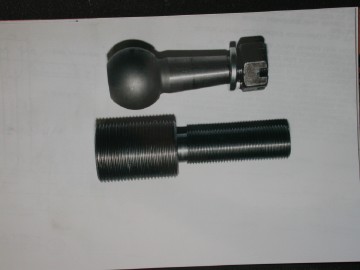
Ball.stud.adapter.jpg

Drag.link.tube.jpg
Next, for the other end of your new drag link, you'll need a spherical rod end,
with 7/8NF male thread, and a 7/8 inch eye. Mine came from Offroad Design here
in Carbondale, but you can source these elsewhere I'm sure. You'll also have to
drill out the taper in the steering arm where the rod end attaches. No going back
after this, unless of course you acquire another steering arm (not expensive). I
found it easier to drill it out once removed from the spindle. Drill it to 7/8"
to accept a grade 8, 7/8" bolt.
You also need to order a ball stud from Garrison. One end is the ball end, which
you already know requires a 1-1/2 inch ball. the other end has the taper which
fits into your pitman arm. Since they make these to order, you order to your
specs, which were as follows for my 63 404 - 0.970 thickness of pitman arm with
0.685 dia small end, 0.775 dia large end. You'll want to measure yours to be
certain it is the same (probably is). With these measurements, they can calculate
the taper to machine onto the ball stud. I ordered two to keep one as a spare for
trail repair, and that if it should break - ever- I wouldn't have to wait for
another custom unit.

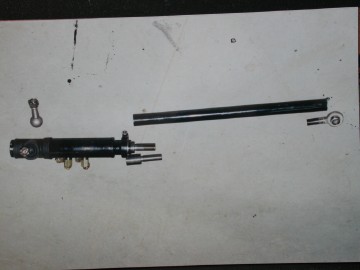
Drag.link.pieces.jpg
So know you should have a complete drag link assembly with a tapered ball stud
on one end that fits into the pitman arm, and a spherical rod end which bolts
to the steering arm. The next part of the equation is power to the system.
My pump was an MB unit (poorly mounted) but I've since upgraded to a Howe Performance
unit with 1300 psi and remote reservoir. The MB unit, at 950 psi, was more than
adequate for the narrow mil spec tires on stock wheels, even in the trails. But my
larger swampers, on the trail, with front locker on taxed the system. It was difficult
to get the pump from Howe because they prefer to only sell complete systems, rather
than just their parts. Their initial suggestion was to scrounge a used pump from a
one ton truck. I persisted and finally got them to sell me theirs, but only after
convincing them that my system would work, which required approval from their engineers!
It is a very nice, small, easy to mount pump that requires a remote reservoir (which
they also sell and has a spin-on filter).
Ok, now you need a hydraulic cylinder to give you the muscle. I used a Rock Ram from
AGR. These are not the best cylinders to use, but it worked out very well and I
have not had any problems with it (knock on wood). It is 2" dia, with 8" stroke
and has a 1500 psi rating. Fortunately, the Unimog has an 8" stroke as well. You
want the ram to reach its end of stroke before your steering limits. This is so
that the hydraulics quit pushing before the physical limitations of your steering
knuckles. Otherwise, you'll break parts. The ram can be mounted from a fabricated
bracket at the third member to the right side tie rod end, as I have it. Or, you
could ditch the steering stabilizer and try to squeeze it into there. The mounts
for the steering stabilizer are not beefy enough to use as mounting points for
the ram, but the location is great. You will also need the spherical rod ends
for this ram, which AGR can sell you.
Another choice for rams could be Howe's unit. This one is 2-1/4 inch dia and
stroke adjustable (by them) to whatever you need. I have one of these on my
26HP 4X4 tractor. It originally had standard steering but was a bear to maneuver
with a full bucket of dirt. So on it I put an orbital valve and ram so it is full
hydraulic, instead of hydraulic assist as the unimog is. If I blow a hose in the
field with the tractor I can't steer anymore, but with the Unimog, I can still
get home (which occurred once when I sliced open the low pressure return line on
something). Anyway, the Howe ram is slightly larger and so would have been more
difficult to mount where my Rock Ram is now. But if starting from fresh, I'd
explore the use of the Howe unit first.
The last thing is to tie this all together with hydraulic lines. I did this by
first purchasing all the fittings at my local NAPA store at the time of mounting
all these parts. This way I could be sure I had enough clearance, and roughly
estimate where my lines would travel. Then, once everything is in place you measure
the length of line you need and have NAPA crimp on the fittings.
Fill the system with fluid, then bleed it by simply turning the wheels lock to lock
(with the front end off the ground), top off the system, and you are ready for the
trail again.
Yeah, like its that easy. For me its been quite a process and a learning experience.
I hope I've steered some of you in the right direction..hehe
As a trail report - It is WONDERFUL. I don't have to worry much about getting steered
off course from hitting rocks as the ram will take most of that impact before it gets
to the steering wheel. I drive it with a loose grip on the wheel and let it slide back
and forth gently as I drive. In technical sections I grip more tightly for better control
and can maneuver most anywhere with one hand on the wheel, and the other on controls, or
the grab handle of the roll cage. Kristopher Dichtl, another Unimog owner, after having
driven mine is sold on the system and says that there is much less fatigue when on long
trails. On the road it steers well, has nice road feedback and there is no wandering,
so this final system is a keeper.
If you're thinking about setting yourself up in the same manner I estimate it would
set you back about 2 large. The big expense is the steering valve at about $1200.
Pump, reservoir, filter about $400. Ball stud at $125. Rock Ram $200. The rest in
hoses, rod end, machining labor, misc hardware to bolt in together. You will need
fabrication skills to mount stuff, like the p/s pump, rock ram, reservoir, etc, or
pay someone to do it.
Next: Brakes
-
|
